DC EVSE testing with A 1732 and MI 3155
1 Testing setup
1.1 A 1732
DC EVSE Adapter is a multi-function test adapter intended for safety and functional testing of DC and AC EVSEs (Electric vehicle supply equipment). The adapter can be used as a standalone unit for connecting to the EVSE and triggering errors, or with the MI 3155 EurotestXD. The MI 3155 can initiate the charging process, do the measurements and trigger the errors remotely.
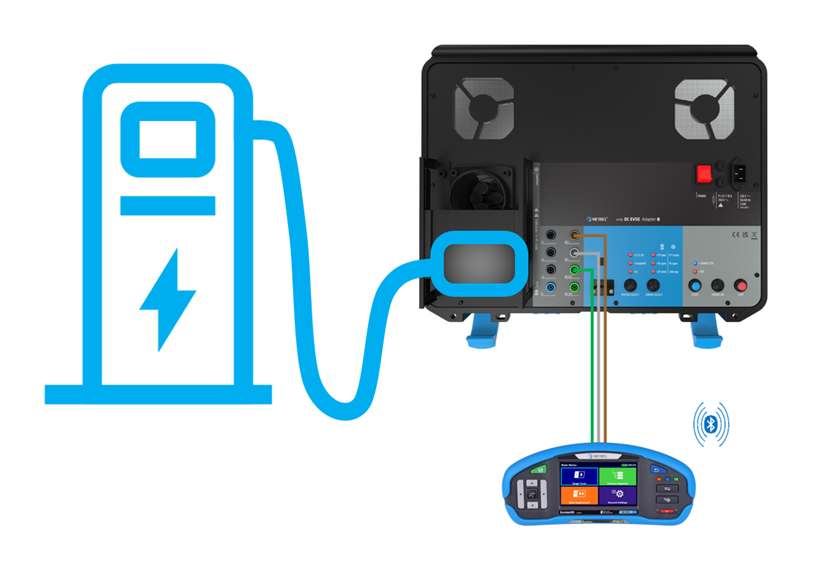
Main functions and features are:
- Simulation of electrical vehicle CCS, CHAdeMO and AC charging systems
- Simulation of faults on PE and control connections
- Monitoring of communication between charging station and adapter (via MI 3155)
- Test sockets for connection of safety testers
- Different safety and functional tests when connected with Metrel Eurotest MI 3155.
1.1.1 Powering the A 1732
The A 1732 is powered by 230 V AC. The energy demand is not that high with a hundred W for idle operation. But when starting charging, the A 1732 need a power of at least 1700 W for a few seconds. More detail below:
- 2,5 kW peak when powering on (11 A for 40 ms)
- 1,7 kW when starting charging (7,5 A for a few seconds)
- Around 100-150 W on idle and in measurement.
In a lab or service there is no problem to get access to 230 V. But on the field, this could be a problem. Below are listed some examples on how to get access to 230 V on the field:
- Extension lead from a nearby grid (petrol station, shop, café,…)
- Service socket form the inside of the EVSE
- Portable powerstation or battery+inverter
- V2L capable EV (not tested)
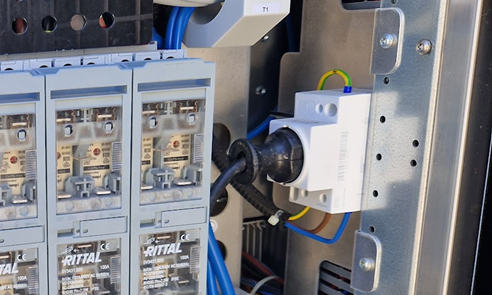
Service socket inside the EVSE
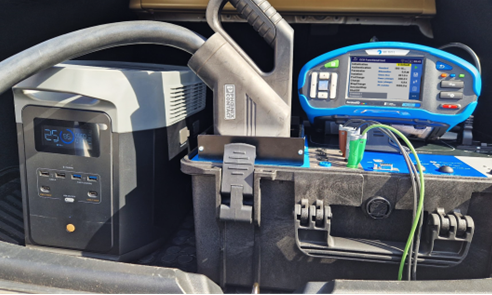
Portable powerstation
1.2 MI 3155
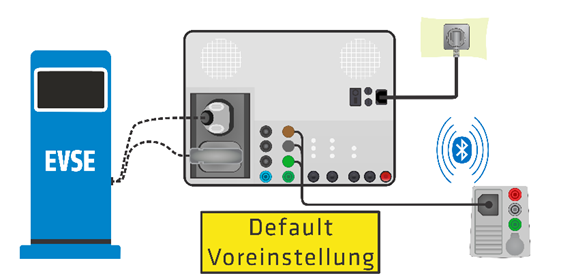
The MI 3155 is used as a measuring device, but it can also perform the functional test when connected to A 1732. The connection with A 1732 is via Bluetooth. To connect to the adapter first ensure that the A 1732 is powered on. Then go to “General Settings” à “Settings” à “Adapter Type”, select A 1732 and search for the correct Bluetooth device name (serial number).
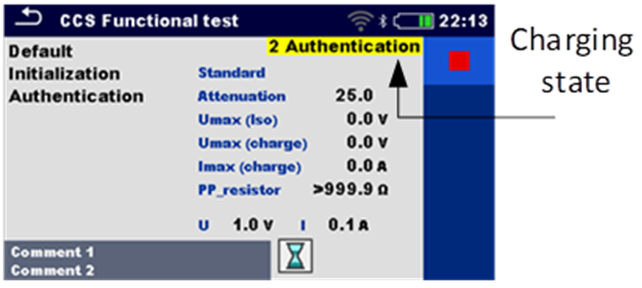
Once the A 1732 is connected the tests for DC EVSE are available in the “Single Test” menu (“Single Test” à “EVSE”). All the tests can be initiate with MI 3155 remotely via BT. The measuring tests need the leads to be connected as well. Every test have the EVSE status in the yellow box on the upper right part of the screen.
1.3 Accessories
Accessories that you need for performing the measurements are in the standard sets of the instrument and adapter.
- A 1781 - Test lead, 3 x 1.5 m (st. acc. with A 1732)
- A 1558 - Test lead, 4 x 1.5 m
- A 1013 and A 1064 - Crocodile clip, black and red
- Or A 1014 and A 1016 - Test probe, black and red
Optional accessories are also available to facilitate the measurements. Especially the 4-wire Rlow measurements:
- A 1593 - Large Kelvin test crocodile
- A 1437 - Test lead with Kelvin probe
- A 1649 10M - Kelvin Extension test lead

2 How to test
Before starting testing is necessary to check which type of EVSE we are testing:
- Manufacturer and type
- How many sockets of each type has
- What are the technical specification of the EVSE (Voltage, current, power, …)
For the report is good to take a picture of the EVSE and a picture of the EVSE technical specifications plate.
There are a few workflows that you can try on how to test the DC EVSE.
2.1.1 Manual testing
A detailed instructions on how to test is listed in the chapter “Testing procedure”. The workflow is divided into three sections. First the Functional test, then the measuring section and at the end the Error triggering.
2.1.2 Predefined tests in Memory structure
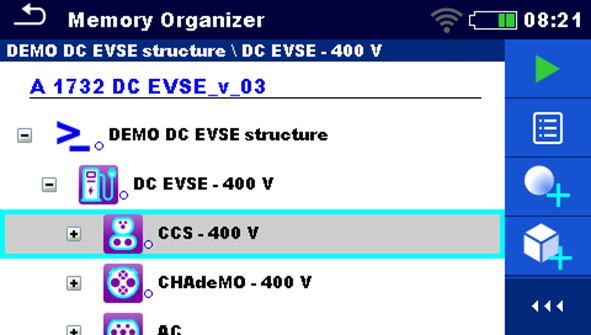
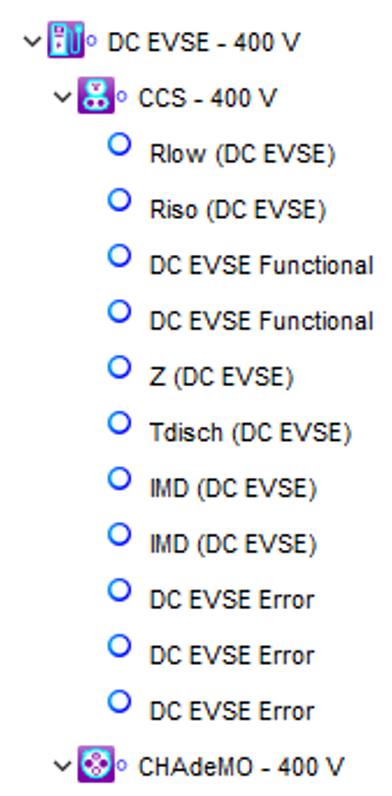
In the attached .padfx file is a memory structure with objects and all the measurements for testing the EVSE. The default version is made for 400 V and 1000 V (800 V) DC EVSE. In the 400 V DC EVSE element are the CCS, CHAdeMO and AC sub-elements. On the 1000 V DC EVSE element is just the CCS sub-element. The difference is the parameters of Riso voltage (500 or 1000 V) and IMD resistor (40k or 95k Ohm). If you find some other setup, feel free to change the parameters.
 DEMO structure - A 1732 DC EVSE_Ver_1.4.padfx
Note that for AC part of the EVSE is preferable to start the AC charging by the A 1732 and then perform our standard Autosequence for AC EVSE already prebuild in the MI 3155. Be aware that the Autosequence will trigger also the RCD in the EVSE and you must be able to switch them back on. Alternatively you can perform manualy a limited set of test vie the MI 3155.
2.1.3 Autosequences
Currently we didn't make the Autosequences for DC EVSE.
3 Testing procedure
When testing, always remember to check and observe the messages on the EVSE. Authorise the charging when requested. When testing the CCS system is this usually after starting the measurement. On the CHAdeMO is this, when the EVSE is in status “B1”. If needed the EVSE will request to unplug and plug back the connector in between the tests.
3.1 Measurements
All the measurements are performed with MI 3155. The A 1732 is used to power-up the EVSE, so the MI 3155 can do the measurements on a live EVSE when needed. The Rlow and Riso measurements are done when the EVSE is powered down, just with the connector pluged in. The rest of the measurements (Zdc, Discharge time and IMD) need the EVSE to be powered on. These apply to CCS and CHAdeMO systems.
Functional test can be made on the CCS, CHAdeMO or AC test systems using just the A 1732 or the MI 3155 with A 1732.
The protocol to test the AC system is a little different. The best way is to manually start the charging process with the A 1732 (System select à AC; Start). Then perform all the necessary measurement. What kind of measurements depend, if you have access to the distribution board of the EVSE. If you have that and you want to test also the RCDs, is advisable to test with the predefined Autosequences for AC EVSE (EVSE 3p No Vent trip), ignoring the first Functional test. If you don’t, you can do the Autosequence for AC EVSE 3p No Vent lock.
Don’t forget to check the parameters before test and to stop the EVSE when instructed to set the CP State to B.
3.1.1 Rlow
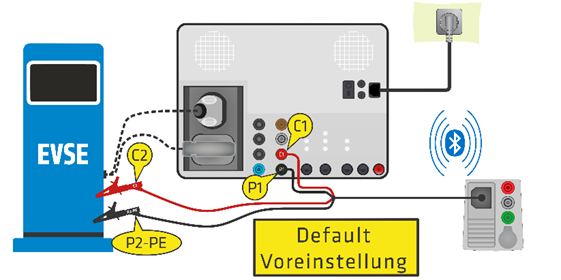
Using the A 1732 with the MI 3155 (EVSE not energised):
- On the MI 3155 go to Single Test à EVSE à 4W Rlow
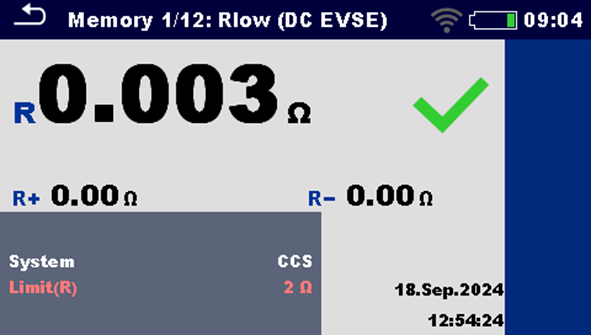
- Set the correct parameters (Ex. SystemàCCS, Limit (R) = 2 Ohm)
- Insert charging plug in the charging inlet
- Connect the 4 wire cable to the MI 3155
- Connect the lead C1 and P1 to the PE (C) and PE (P) test points on A 1732
- Connect the C2 and P2 to a the metal housing of the EVSE (useful tool are the Kelvin tips A 1437 or Kelvin clamps A 1593)
- Press RUN key on the MI 3155
- Save the result
- Repeat the measurement to all accessible metal parts in the vicinity of the EVSE.
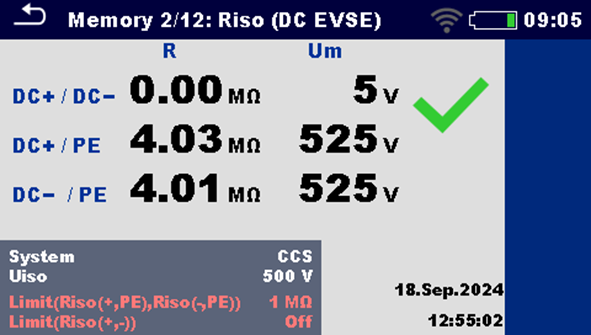
3.1.2 Riso
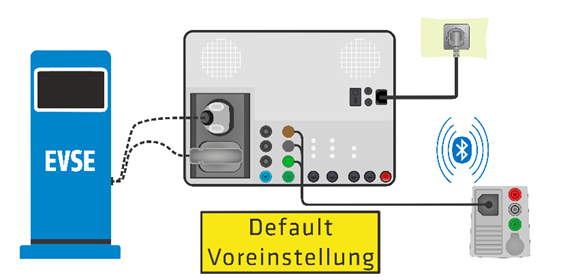
Using the A 1732 with the MI 3155 (EVSE not energised):
- On the MI 3155 go to Single Test à EVSE à Riso
- Set the correct parameters (Ex. SystemàCCS, Uiso = 1000 V)
- The test volage should be at least the maximum working voltage or at least 500 V
- Insert charging plug in the charging inlet
- Connect the A 1781 cable to the MI 3155
- Connect the lead DC+, DC- and PE to the appropriate test points on A 1732
- Press RUN key on the MI 3155
- Save the result
3.1.3 Charging process
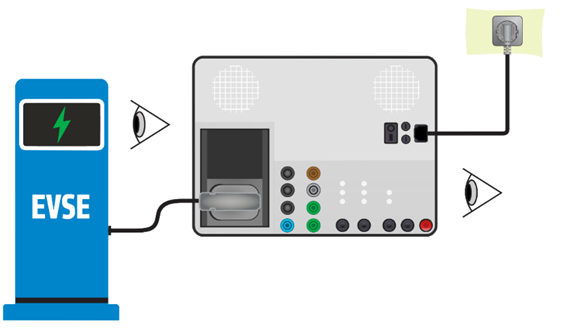
Using the A 1732:
- Set charging system on the adapter
- Insert charging plug in the charging inlet
- Authorize and follow instructions on the EVSE
- Press START key on the adapter
- Press START on the EVSE, if needed
- Check progress of the charging sequence on the EVSE and the LEDs on the adapter.
- The charging process will be stopped automatically after 20s.
- Check that the EVSE went through all steps of the charging sequence successfully.
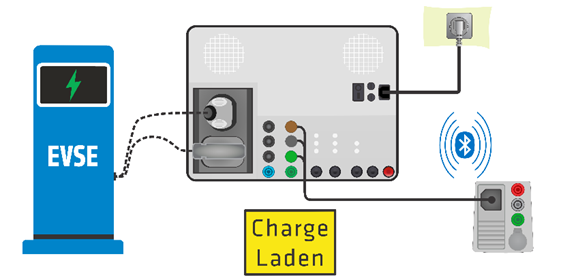
Using the A 1732 with the MI 3155:
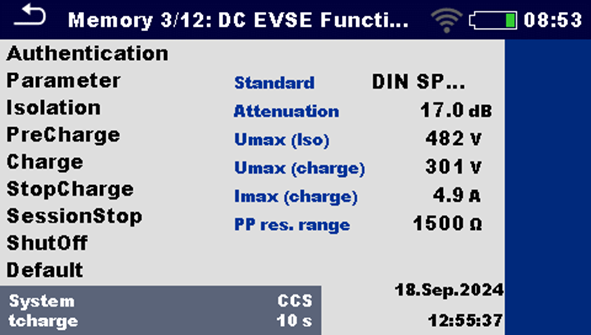
- On the MI 3155 go to Single Test à EVSE à Functional
- Set the correct parameters (Ex. SystemàCCS, tchargeà10 s)
- Insert charging plug in the charging inlet
- Press RUN key on the MI 3155
- Authorize and follow instructions on the EVSE
- Press START on the EVSE, if needed
- Check progress of the charging sequence on the MI 3155
- The charging process will be stopped automatically after time selected in the parameters (tcharge).
- Check that the EVSE went through all steps of the charging sequence successfully.
- Save the result
3.1.4 Charging cancelled by EVSE
Using the A 1732:
- Set charging system on the adapter
- Insert charging plug in the charging inlet
- Authorize and follow instructions on the EVSE
- Press START key on the adapter
- Press START on the EVSE, if needed
- Check progress of the charging sequence on the EVSE and the LEDs on the adapter.
- When the charging start, wait for at least 5 s and press STOP button on the EVSE to stop the charging.
- Check that the EVSE has stopped.
Using the A 1732 with the MI 3155:
- On the MI 3155 go to Single Test à EVSE à Functional
- Set the correct parameters (Ex. SystemàCCS, tcharge >10 s)
- Insert charging plug in the charging inlet
- Press RUN key on the MI 3155
- Authorize and follow instructions on the EVSE
- Press START on the EVSE, if needed
- Check progress of the charging sequence on the MI 3155
- When the charging start, wait for at least 5 s and press STOP on the EVSE to stop the charging.
- Check that the EVSE has stopped.
3.1.5 Zdc
Using the A 1732 with the MI 3155:
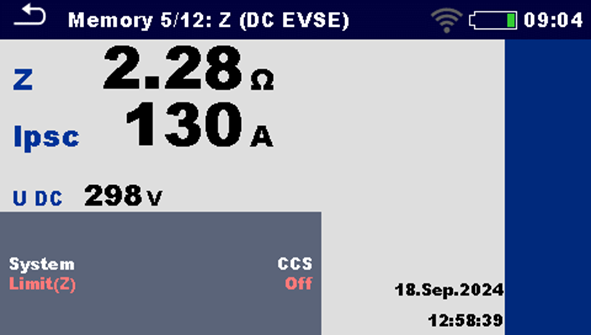
- On the MI 3155 go to Single Test à EVSE à Zdc
- Set the correct parameters (Ex. SystemàCCS)
- The limit is set to Off by default, because there is no regulation. Usually the Zdc is around 1-3 Ohm.
- Insert charging plug in the charging inlet
- Press RUN key on the MI 3155
- Authorize and follow instructions on the EVSE
- Press START on the EVSE, if needed
- Check progress of the charging sequence on the MI 3155
- The Zline test will be carried out automatically 5 seconds after the Charge (CCS) / Energy transfer (CHAdeMO) has started. Press STOP key to stop it earlier.
- Save the result
3.1.6 Discharging time
Using the A 1732 with the MI 3155:
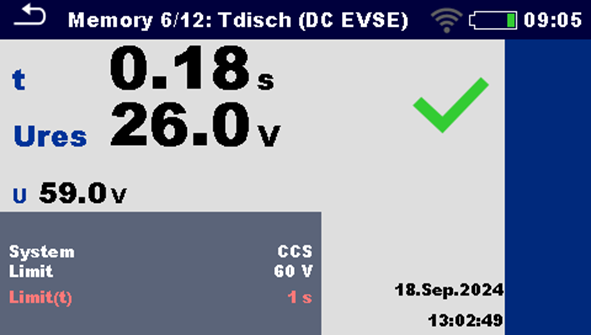
- On the MI 3155 go to Single Test à EVSE à U Tdisch
- Set the correct parameters (Ex. SystemàCCS, Limit à 60 V, Limit t à 1 s)
- Insert charging plug in the charging inlet
- Press RUN key on the MI 3155
- Authorize and follow instructions on the EVSE
- Press START on the EVSE, if needed
- Check progress of the charging sequence on the MI 3155
- The Discharging time test will be carried out automatically 5 seconds after the Charge (CCS) / Energy transfer (CHAdeMO) has started. Press STOP key to stop it earlier.
- Check if the EVSE has stopped charging
- Save the result
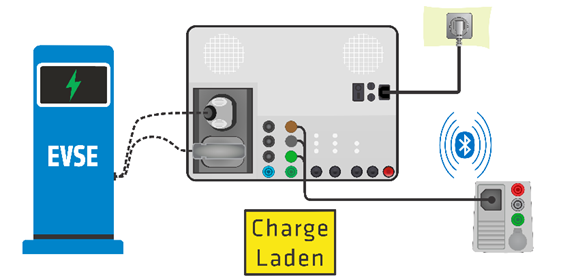
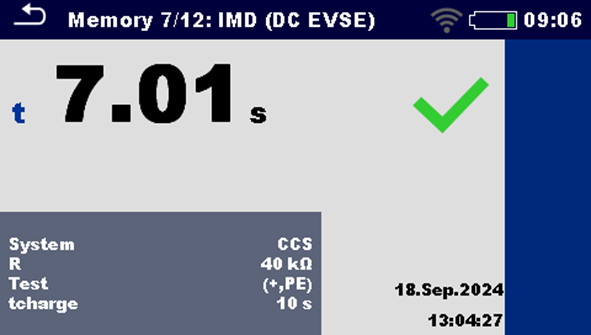
3.1.7 IMD (Ω)
Using the A 1732 with the MI 3155:
- On the MI 3155 go to Single Test à EVSE à IMD
- Set the correct parameters (Ex. SystemàCCS, Rà see table below, Test à (+, PE) tcharge à 20 s)
- Insert charging plug in the charging inlet
- Press RUN key on the MI 3155
- Authorize and follow instructions on the EVSE
- Press START on the EVSE, if needed
- Check progress of the charging sequence on the MI 3155
- The Discharging time test will be carried out automatically 5 seconds after the Charge (CCS) / Energy transfer (CHAdeMO) has started. Press STOP key to stop it earlier.
- Check if the EVSE has stopped charging
- Save the result
3.2 Errors
Errors can be triggered manually on the A 1732 with the button ERROR ON, or with an automated test on MI 3155. The errors can be made on the CCS, CHAdeMO or AC test systems.
3.2.1 CP open / CP 3 open
Using the A 1732:
- Set charging system on the adapter
- Set the ERROR SELECT to CP open / CP 3 open
- Insert charging plug in the charging inlet
- Authorize and follow instructions on the EVSE
- Press START key on the adapter
- Press START on the EVSE, if needed
- Check progress of the charging sequence on the EVSE and the LEDs on the adapter.
- When the charging start, wait for 5 s and press ERROR ON button on the A 1732 to trigger the error.
- Check that the EVSE has stopped.
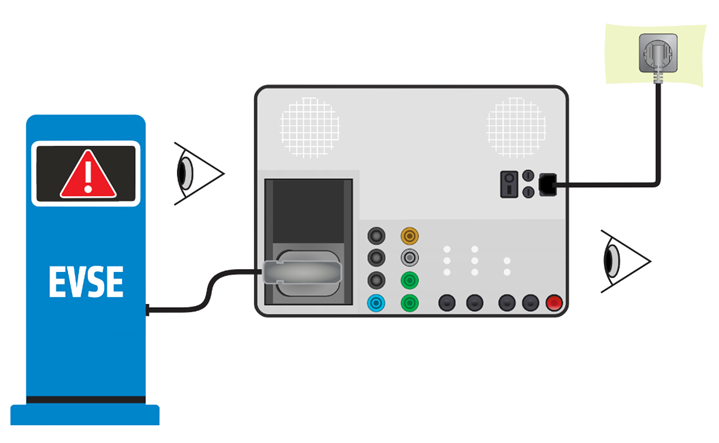
Using the A 1732 with the MI 3155:
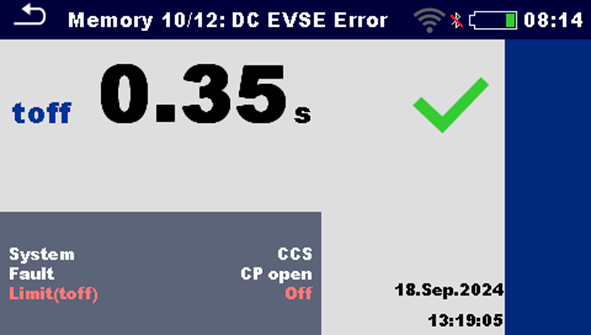
- On the MI 3155 go to Single Test à EVSE à DC EVSE Error
- Set the correct parameter Fault à CP open (CCS) or CP 3 open (CHAdeMO)
- Insert charging plug in the charging inlet
- Press RUN key on the MI 3155
- Authorize and follow instructions on the EVSE
- Press START on the EVSE, if needed
- Check progress of the charging sequence on the MI 3155
- When the charging start, the A 1732 will wait for 5 s and then trigger the error on the EVSE.
- Check that the EVSE has stopped and “toff” time on the MI 3155
3.2.2 PE open / PE open
Using the A 1732:
- Set charging system on the adapter
- Set the ERROR SELECT to PE open / PE open
- Insert charging plug in the charging inlet
- Authorize and follow instructions on the EVSE
- Press START key on the adapter
- Press START on the EVSE, if needed
- Check progress of the charging sequence on the EVSE and the LEDs on the adapter.
- When the charging start, wait for 5 s and press ERROR ON button on the A 1732 to trigger the error.
- Check that the EVSE has stopped.
Using the A 1732 with the MI 3155:
- On the MI 3155 go to Single Test à EVSE à DC EVSE Error
- Set the correct parameter Fault à PE open (on CCS and CHAdeMO)
- Insert charging plug in the charging inlet
- Press RUN key on the MI 3155
- Authorize and follow instructions on the EVSE
- Press START on the EVSE, if needed
- Check progress of the charging sequence on the MI 3155
- When the charging start, the A 1732 will wait for 5 s and then trigger the error on the EVSE.
- Check that the EVSE has stopped and “toff” time on the MI 3155
3.2.3 CP short / CAN stop
Using the A 1732:
- Set charging system on the adapter
- Set the ERROR SELECT to CP short / CAN stop
- Insert charging plug in the charging inlet
- Authorize and follow instructions on the EVSE
- Press START key on the adapter
- Press START on the EVSE, if needed
- Check progress of the charging sequence on the EVSE and the LEDs on the adapter.
- When the charging start, wait for 5 s and press ERROR ON button on the A 1732 to trigger the error.
- Check that the EVSE has stopped.
Using the A 1732 with the MI 3155:
- On the MI 3155 go to Single Test à EVSE à DC EVSE Error
- Set the correct parameter Fault à CP short (CCS) or CAN stop (CHAdeMO)
- Insert charging plug in the charging inlet
- Press RUN key on the MI 3155
- Authorize and follow instructions on the EVSE
- Press START on the EVSE, if needed
- Check progress of the charging sequence on the MI 3155
- When the charging start, the A 1732 will wait for 5 s and then trigger the error on the EVSE.
- Check that the EVSE has stopped and “toff” time on the MI 3155
4 List of tested EVSE
EVSE producer | EVSE type | Plugs | Status |
ABB | ABB HP CP500 C | CCS2 | OK |
ABB | ABB Terra DC wallbox CE - CJ | CCS2, CHAdeMO | OK |
ABB | ABB TERRA 54 CJG 22KW AC- 3P1499080000A | CCS2, CHAdeMO, AC | OK |
ABB | ABB TERRA 54 HVCJG, 3P639901000A | CCS2 | OK |
ads-tec | ads-tec Energy DVK-CPT1122 000-AA/AG | CCS2 | OK |
Alpitronic | Alpitronic, Hypercharger HYC_400 HW:4.0 | CCS2 | OK |
Alpitronic | Alpitronic, Hypercharger HYC_300 HW:4.0 | CCS2 | OK |
Alpitronic | Alpitronic, Hypercharger HYC_50 HW:1st Edition.0 | CCS2 | OK |
ATESS | ATESS EVD-40D | CCS2 | No IMD |
ATESS | ATESS EVD-40S | CCS2 | No ISO pretest, no IMD |
ATESS | ATESS EVC-AC22S/DC60D | CCS2, AC | No IMD, AC PP value NO |
AUTEL | AUTEL Maxi Charger DC Compact DC40 | CCS2 | OK |
Designwerk | Designwerk MDC22-19-2.0 | CCS2, CHAdeMO | OK |
DELTA | DELTA SEVC 100KW 2IN1 C0C-SW0LK-000-0A0 Rev 02 | CCS2 | OK |
DELTA | DELTA EVC 150KW 3IN1 HA-P0-LWEDK-00 TR Rev.00 | CCS2, CHAdeMO, AC | OK |
DELTA | DELTA EVC 150KW 4IN1 CH-AS-SWEDK-00 TR Rev.02 | CCS2, CHAdeMO, AC | OK |
DELTA | DELTA EVC 110KW 3IN1 AC-PO-LWED5-00 TR Rev.00 | CCS2, CHAdeMO, AC | OK |
DELTA | DELTA EVC 110KW 4IN1 CC-AS-SWED5-00 TR Rev.02 | CCS2, CHAdeMO, AC | OK |
DELTA | DELTA EVC 110KW 4IN1 CC-AS-LWED5-00 TR Rev. 02 | CCS2, CHAdeMO, AC | OK |
Ecotap | Ecotap DC250 | CCS2 | PE to DC- IMD test failed (1 try) |
Ecotap | Ecotap DC30 | CCS2 | OK |
efacec | efacec, EFAPOWER EV QC45 CE GCCB DCA DCC AC43 | CCS2, CHAdeMO, AC | OK |
Ekoenergetyka | AXON EASY 120 CCS/CCS, QP-10339-1123-121-QP-VER.324 | CCS2 | EVSE STOP not working |
GRESGYING | GRESGYING F1-EU30 C | CCS2 | No ISO pretest, no IMD |
Heliox | Heliox Mobile charger 40 kW | CCS2 | EVSE Riso test low voltage (107 V) |
Implera | Implera, Elevat E DC40 ali DC60 | CCS2, CHAdeMO, AC | No ISO pretest, R low CHAdeMO too high |
Implera | Implera, Elevat DC20 | CCS2, CHAdeMO | No ISO pretest, no IMD |
KEMPOWER | KEMPOWER Satellite 2x CCS2/5m | CCS2 | OK |
KEMPOWER | KEMPOWER T800 Charger CCS2 | CCS2 | OK |
Kostad | Kostad Triberium Fast Charger »SIEMENS« | CCS2, CHAdeMO, AC | OK |
PRO CHARGE | PRO CHARGE PRO CCS2 2.0 DC 50KW | CCS2 | No IMD |
SETEC | SETEC SET-450-20B | CCS2, CHAdeMO | No ISO pretest |
SOLA | SOLA DC-60-DUO | CCS2 | OK |
Tellus | Tellus Power 20kW DC Charger, D-20-CCS2-20-YD-V1.0 | CCS2 | OK |
Tellus | Tellus Power 20kW Single CCS2, TP-EVPD-CCS2-750020CGU1 | CCS2 | OK |
Tesla | Tesla Supercharger V4 | CCS2 | Riso test lock the EVSE |
Tesla | Tesla Supercharger V3 | CCS2 | Riso test lock the EVSE |
Tesla | Tesla Supercharger V2 | CCS2 | OK |
Volkswagen | Volkswagen Group Components AFC-200-LH-DE | CCS2 | OK |